
The Complete Guide to AI Image Upscaling: How It Works and When You Need It
Every image upscaler faces the same problem: it has to produce pixels that aren't in the original. A 1000-pixel-wide photo enlarged to 4000 pixels has sixteen times as many pixels, and fifteen of every sixteen must be created. How a tool creates them is the whole difference between a soft, blurry enlargement and one that looks sharp. This post explains, step by step, how the classic methods do it, how AI super-resolution does it, how a neural network can run inside a web browser, and how to measure the result rather than take anyone's word for it.
Classic resizing: averaging the neighbours
Before neural networks, every enlargement was a form of interpolation: estimating each new pixel from the original pixels around it.
- Nearest neighbour copies the closest original pixel. Fast, and it keeps hard edges, but everything turns into visible squares. Pixel art is enlarged this way on purpose.
- Bilinear blends the four nearest pixels. Smooth, but soft.
- Bicubic uses sixteen surrounding pixels with a curve that preserves a little more edge contrast. It's what most editors and browsers use by default for "high quality" resizing.
- Lanczos uses a wider window and keeps edges a bit crisper again, at the cost of faint ripples next to strong edges.
All of these share one limitation: they only look at numbers, not at what the numbers depict. An edge between a dark eyelash and light skin is, to bicubic interpolation, just a steep change in values, and the best it can do is draw a smooth slope across the gap. That slope is the blur you see in every enlarged photo. No amount of tuning fixes it, because the information needed to draw a sharp edge in the right place isn't in the neighbouring pixels.
Super-resolution: learning what detail looks like
AI upscaling, properly called single-image super-resolution, takes a different approach. Instead of a fixed formula, it uses a neural network that has learned, from many example images, what fine detail typically looks like given a low-resolution input.
The training is conceptually simple. Researchers take a large collection of high-resolution photos, shrink each one, and ask the network to reproduce the original from the small version. Each time it gets it wrong, its internal parameters are nudged towards a better answer. After millions of examples, the network has absorbed patterns: how edges continue, what hair and foliage and text look like up close, how a blurred step between two colours usually resolves into a sharp boundary.
A few milestones in this line of research:
- SRCNN (2014) showed that a small convolutional network could beat bicubic interpolation clearly on standard benchmarks.
- ESRGAN (2018) added a second network during training, a "discriminator" that tries to tell real photos from upscaled ones. The upscaler is rewarded for fooling it, which pushes results towards realistic texture instead of a safe, smooth average.
- Real-ESRGAN (2021) trained on images degraded in many realistic ways at once (blur, noise, JPEG compression, repeated resizing) so it copes better with real-world photos rather than clean, artificially shrunk ones. It's the model family used by desktop apps such as Upscayl.
The discriminator idea explains both the strength and the main quirk of modern upscalers. They produce believable texture, because they were trained to. But believable isn't the same as true. When the input doesn't contain enough information, the network fills the gap with what similar images usually contain: plausible skin, plausible fabric, plausible leaves.
What "2x" and "4x" models mean
A super-resolution network is usually trained for one fixed factor. A 4x model always outputs four times the width and height of its input; a 2x model, twice. To get a different size, tools run the nearest model and then resize the result. Our upscaler offers exactly 2x and 4x for that reason: each maps to one pass of a matching model, and any small adjustment to hit an exact target size is a plain resize afterwards.
That's also why running a 4x result through a 4x model again rarely helps. The second pass treats the first pass's invented texture as real input and invents more on top of it.
Running a neural network in a browser
Server-side upscalers run models on dedicated graphics cards. A browser upscaler has to run on whatever computer the visitor has, through web standards. That shapes it in three ways:
- A compact model: it has to be small enough to download once and keep in the browser's cache, so it is far smaller than the models desktop apps run.
- The visitor's own hardware: the calculations run on the computer's graphics chip, inside the browser, instead of on a server.
- Tiling: the image is cut into small patches that overlap by a few pixels, each patch is upscaled separately, and the results are stitched back together. This keeps memory use small enough for ordinary laptops, and the overlap prevents visible seams.
Tiling is why processing time grows with the size of the input rather than the factor. In our tests a 480-pixel image took 3 to 6 seconds at 4x once the model was loaded, while a 1.7-megapixel photo took about 20 seconds at 2x. The first run of a session is slower because the model has to be downloaded and "warmed up".
The browser imposes limits that a desktop app doesn't. Mobile browsers don't give web pages enough memory for the model, so on phones and tablets our tool uses a classic engine instead (stepwise high-quality resizing plus the enhancement sliders). On computers, the AI handles source images up to about 10 megapixels, and the tool is made for results up to 4K, a size browsers on ordinary computers handle reliably.
Measuring the difference
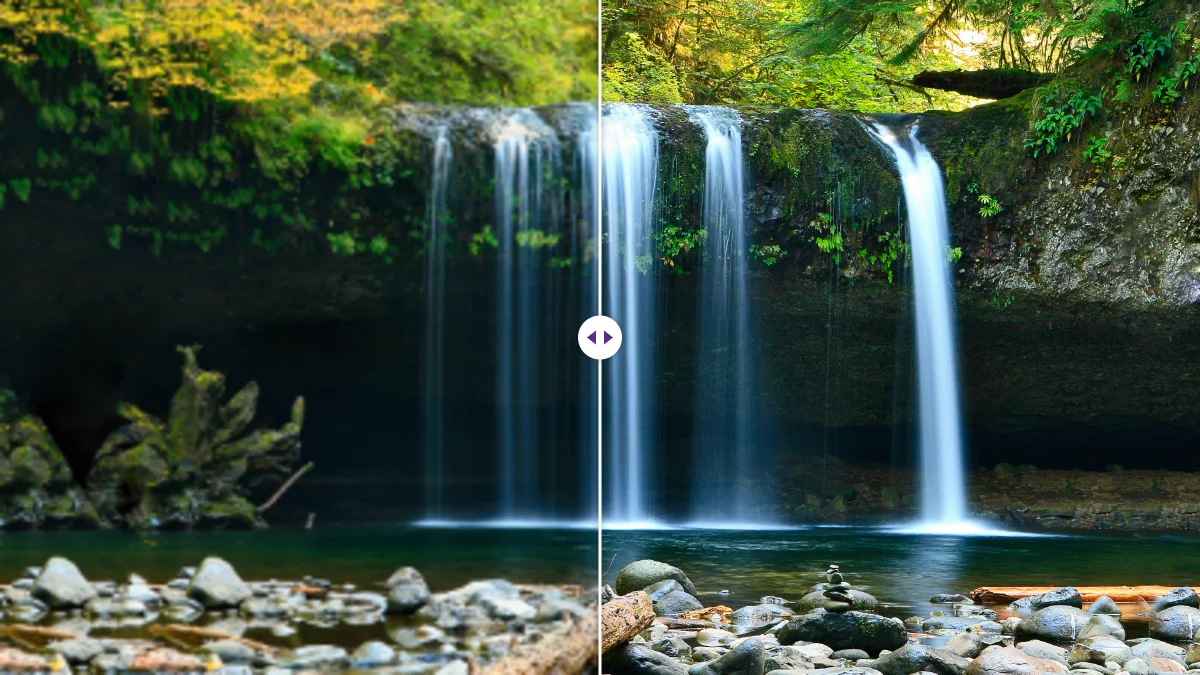
"Sharper" is easy to claim. We measured it. We took a portrait, reduced it to 480 × 480 pixels as a stand-in for an old low-resolution photo, and enlarged it 4x to 1920 × 1920 two ways: with the browser's own high-quality resize, and with the AI model. Then we measured edge detail on the same 480 × 480 crop of the face in both, using the variance of the Laplacian (a standard measure of how much fine edge contrast an image has).
The plain resize scored 3.0. The AI result scored 34.7. That is a measure of edge contrast, not of genuine detail: the model sharpens edges it predicts, and some of what it draws was never in the small file. Looking at the images explains the number: eyelashes were separate strands again, the edges of the teeth were clean, and the hairline had texture instead of a soft smudge. It also showed the quirk: the skin came out smoother than in a real high-resolution photo, a little like a light retouch.
A note on measurement. Research papers often report PSNR, a number that rewards being close to the original pixel by pixel. Models trained with a discriminator usually score slightly lower on PSNR than smoother models, while looking better to people, because realistic texture in slightly the wrong place costs more points than a safe blur. That's why we looked at edge detail and at the images themselves rather than at a single benchmark number.
Why results vary so much between photos
- Content the model knows well (faces, hair, text, common objects, natural textures) comes out best.
- Compression damage confuses it: JPEG blocks are "detail" too, and can be enlarged as such. Starting from the cleanest copy matters more than any setting.
- Blur isn't missing resolution; it's missing information. An out-of-focus photo enlarged is a larger out-of-focus photo.
- Tiny subjects give the model too little to work with, so what it produces is mostly its own guess.
- Transparency needs special handling, because the model only sees colour. While testing, we found our upscaler turned transparent backgrounds black; it now fills the empty area from the nearest edge colours before upscaling and restores the original transparency afterwards.
Why it fools the eye
One last point about why this works at all. Our eyes judge sharpness mostly by edges: the boundaries between light and dark. A picture with crisp edges and simplified texture reads as sharp; a picture with accurate texture and soft edges reads as blurry. Super-resolution models exploit this. They spend their effort where we look, which is why an AI result can look sharper than its information content strictly justifies.
Putting it to use
Knowing how it works leads to a few practical habits. Feed the model the cleanest, largest original available. Choose the factor that reaches the size you need, since each extra doubling is more invention, not more truth. Leave sharpening at zero at first, because the model already rebuilds edges. Check results at 100% on the parts that matter. And save photos as JPG or WebP; in our tests a 2x result was 6.85 MB as PNG and 337 KB as WebP with no visible difference.
For specific jobs, the guides go further: how to increase image resolution for print, how to upscale an image to 4K for screens, and the differences between upscaling and enhancing. If you'd like to try it, the image upscaler runs entirely in your browser; your photo isn't uploaded anywhere.
Frequently asked questions
Why does an ordinary resize make images blurry?
Interpolation estimates each new pixel from its neighbours, so a sharp edge becomes a smooth slope between two values. The information to draw the edge sharply isn't in the neighbouring pixels.
Is AI upscaling real detail?
It's a learned estimate. Edges and shapes are rebuilt convincingly, while fine random texture such as pores or gravel is invented to look plausible rather than recovered.
Why does the browser upscaler work in tiles?
It processes the image in small patches that overlap a little, so ordinary laptops have enough memory, and the overlap prevents visible seams.
Keep reading
Free image tools, right in your browser
Upscale, remove backgrounds, strip metadata, crop, compress or make a QR code. No upload, no signup, no watermark.