
Should You Remove the Background First or Upscale First? We Tested Both
If you have a small photo that needs both a clean cut-out and more pixels, the order matters a little, and for one reason it used to matter a lot. Short answer: upscale first, then remove the background. In our test that order gave edges about 20% crisper, with no downside. The rest of this post shows the test, the numbers, the bug it uncovered in our own upscaler, and the cases where the order genuinely doesn't matter.
The question, and why people ask it
It comes up most with product photos. A supplier sends a 500-pixel image on a grey background; the shop wants 1000 pixels or more on pure white. That's two jobs: make it bigger, and swap the background. The same pairing shows up with profile pictures (cut yourself out of a holiday photo, then make it large enough for a banner) and with thumbnails and slides.
Both jobs are done by AI models, and both models care about pixels. A background remover decides, pixel by pixel, what belongs to the subject. An upscaler invents detail between existing pixels. So it's reasonable to wonder whether one should go first to give the other more to work with.
How we tested it
We used a photo of four small canvas dog shoes, reduced to 480 × 360 pixels: about the size of a supplier thumbnail or an image saved from a chat. It's a good test subject because it has the edges that usually go wrong: shoelaces, small metal eyelets, frayed fabric and gaps between objects.
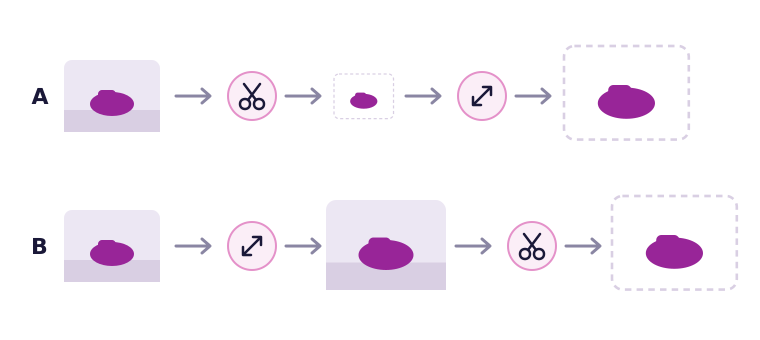
Then we ran it through our own tools in two orders:
- Order A, cut out first: the background remover on the 480-pixel image, then the image upscaler at 4x, saved as PNG.
- Order B, upscale first: the upscaler at 4x to 1920 × 1440, then the background remover on the large image.
Both orders end with a 1920 × 1440 transparent PNG. We compared the two results pixel by pixel, looked at the edges at 100% on a bright magenta background (which shows every fringe and halo), and timed each step.
What went wrong first: the black background
The first run of order A produced something we didn't expect from our own tool: the upscaled cut-out had no transparency at all. Everything that should have been transparent was solid black.
The reason is mechanical. The AI model inside the upscaler reads only the red, green and blue values of each pixel, not the transparency. A fully transparent pixel has no meaningful colour, and browsers hand it over as black. So the model saw a shoe on a black background, enlarged that faithfully, and the transparency was gone.
We fixed it the same day. The upscaler now checks whether an image has transparency. If it does, it gives the AI model an opaque copy where the empty area is filled with the nearest edge colours (so no black creeps into the edges), runs the upscale, and then puts a smoothly enlarged copy of the original transparency back on the result. If you choose JPG, which can't store transparency, the image is now placed on white instead of black.
After the fix, order A gave a proper transparent PNG, 61% of it transparent, with clean corners. If you tried upscaling a cut-out or a logo with a transparent background before October 2026 and got a black box, that's what happened, and it's worth trying again.
The comparison, after the fix
With both orders working, the results were closer than we expected.
- Same outline. We compared which pixels each version counted as "subject". They agreed on 99.7% of them. The background remover found the same shoes, the same laces and the same gaps either way.
- Edge softness differs. We measured how wide the soft edge is: the band of half-transparent pixels between subject and background. With the lighter model the tool used at first, order A had 16.6 half-transparent pixels for every pixel of outline and order B had 13.2, so order B's edges were roughly 20% tighter. We repeated the test after computers switched to the better model: 8.6 against 6.8, the same 20% gap, with both edges about half as soft as before.
- No dark fringe either way. The average brightness of the half-transparent edge pixels was 75.2 in A and 75.6 in B, so the fix doesn't leave a dark rim around a cut-out.
Why does B win on edges? In order A, the edge is decided on a 480-pixel image and then stretched 4x, so each step from "subject" to "background" is smeared over four times as many pixels. In order B, the background remover decides the edge on the 1920-pixel image, so the transition is drawn at full resolution.
How visible is that 20%? On the magenta background at 100% zoom, we had to look closely at the laces and the eyelets to tell the two apart. On a white product page at normal size, nobody would. It's a real difference, but a small one.
Time and effort
The cost hardly differs. With the model computers now use, the background remover took 1.5 seconds on the small image and 1.8 seconds on the 1920 × 1440 one, because it always looks at the photo at 1024 pixels. The upscaler takes the same time either way, a few seconds for a 4x pass on this image once its model is loaded. Neither is a reason to choose one order over the other.
One practical point does favour order A: if you're producing several background colours or versions from one photo, you only need to upscale the cut-out once. With order B you'd also only upscale once, so that's a tie too.
Our recommendation
- If the photo is small (under about 1000 pixels on the long side) and needs to be bigger anyway: upscale first, then remove the background. Slightly crisper edges, no extra work.
- If the photo is already large enough: just remove the background. Don't upscale for its own sake.
- If you already have a cut-out and need it bigger: upscale it directly. Since the fix, transparency survives.
- If the subject is small within the frame, crop to it before either step. The background remover judges the photo at a fixed internal size, so a subject that fills the frame gets a more detailed edge. Cropping first also helps when the AI picks the wrong subject; in one of our tests it kept bright leaves and removed a grey cat until we cropped to the cat.
When the order makes no difference
If the final image goes on a white or coloured background as a JPG, the edge softness matters less, because the soft edge blends into a known colour. A white-background product photo made either way looks the same at normal size. And if you choose White in the background remover, there's no transparency to lose in the first place.
It also doesn't matter for large photos. A 3000-pixel photo cut out at full size already has plenty of edge detail; upscaling it further mostly adds file size.
A workflow for small product photos
- Crop to the product with a little margin.
- Upscale 2x or 4x in the image upscaler, enough to reach the store's minimum (often 1000 pixels for zoom). Leave the enhancement sliders at zero unless the photo is grainy.
- Remove the background and choose White (for marketplaces) or Transparent (for designs and slides).
- Crop again so the product fills most of the frame, usually as a square.
- Save as JPG on white, or as PNG or WebP if you need transparency. If the file is too large for the upload form, the image compressor can bring it under a size in KB.
The guide to white background product photos covers the marketplace rules and framing in more detail, and the guide on how to make a background transparent covers keeping transparency intact and the file size down. In that second guide we found that saving a transparent cut-out as WebP made it about a tenth the size of the PNG with the transparency intact.
The same logic for other steps
The principle behind the answer, decide edges and details at the highest resolution you'll use, applies to the other steps in a typical image job too. When a photo needs several things done to it, this order has worked best in our testing:
- Crop first. Cropping throws pixels away, so do it before anything that costs time per pixel. A crop also means the upscaler spends its effort only on the part you keep, and on very large photos it can bring the image under the size where the AI model is used (about 10 megapixels).
- Upscale second, to the size the final use needs.
- Remove or replace the background third, at full size, for the crispest edges.
- Add text or graphics fourth, if any, so they're drawn at full resolution rather than enlarged.
- Compress last. Every JPG or WebP save loses a little quality, so compress once, at the end, to the size or limit you need. Compressing early and then editing means compressing twice.
- Strip metadata before sharing. Photos from phones often carry the location they were taken; the metadata remover deletes it without re-encoding the picture.
Not every job needs every step, but the order rarely needs to change.
What we learned beyond the answer
We ran this test to answer a reader question and ended up fixing a bug that affected anyone upscaling a logo, a sticker or a cut-out. That's the argument for testing your own tools on real tasks instead of assuming they work: the order question had a modest answer, but the test it required found a real problem. The numbers above are from a single photo, so treat the 20% as a direction, not a law. The direction, though, makes sense: decide edges at the highest resolution you're going to use.
Frequently asked questions
Should I remove the background first or upscale first?
For small photos, upscale first and remove the background second. In our test the soft band along the edges came out about 20% narrower in that order.
Does upscaling keep transparency?
Yes. Since October 2026 our upscaler keeps the transparent area of PNG and WebP images; if you choose JPG, which can't store transparency, the image is placed on white.
Which format keeps a transparent cut-out small?
WebP. In our test it made a cut-out about a tenth the size of the same image as PNG, with the transparency intact.
Keep reading
Free image tools, right in your browser
Upscale, remove backgrounds, strip metadata, crop, compress or make a QR code. No upload, no signup, no watermark.